Line, Oval and Rectangle Tool
:: Lessons :: Basic Lessons
Page 1 of 1
 Line, Oval and Rectangle Tool

The Line tool is used in much the same way that you would use a real pencil to draw with a ruler. Simply select the tool and drag on the Stage to draw a straight line between the start and end points.
SHIFT key : Constrain angles
You can press the Shift key while dragging to constrain possible angles for the line. By default this will only allow for lines that are either horizontal, vertical or 45 degrees between.
Colors
You can specify the color with the Stroke Color Tool.

Curving
You can turn a straight line into a curve with the Arrow tool Tool Box : Arrow
1: Make sure the line is not selected (you can do this by clicking somewhere on an empty spot on the stage).
2: Select the Arrow tool.
3: Click on the line, and while holding down the mouse button, drag the curve.
4: Release the mouse button and your curve is finished.
Curving Lines and Edges:

Moving
You can move a line with the mouse, quite similar to how you'd turn it into a curve or you can move it with the arrow keys.
1: Select the Arrow tool.
2: Make sure the line is selected (you can do this by clicking once on the line then release the mouse button).
3a: Click on the line, and while holding down the mouse button, move it to the new position.
3b: Press the arrow keys on your keyboard to move the line.
Precise size and positioning
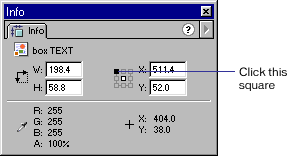
You can position the line perfectly by using the info panel.
Info Panel : Window > Panels > Info

The "square" connected to the line where it says "Click this square" is used to set the origin for coordinates - either at top left or center of the stage.
Fields for X and Y are used to enter the position of the selected object.
Fields for W and H are used to enter the width and height of the selected object.
When working with lines, one might think that height would be 1 for a thin line. However, width and height refers to the square between the start and end points of the selected object.
A horizontal line that is 100 pixels wide and 1 pixel high spans a square of 100 x 1 pixels.
A similar line would span a square of 100 x 100 pixels if it was turned 45 degrees.
Last edited by Wingedge on Tue Jun 17, 2008 7:07 pm; edited 1 time in total

Wingedge- Admin

-

Number of posts : 77
Age : 40
Name : Sir Francis
Year Level : Instructor
Location : UC
Registration date : 2008-06-10
Credits
GP: 9999
 Oval Tool

The Oval tool is used to make circular objects. Simply select the tool and drag on the Stage to draw a circle that spans between the start and end points.
SHIFT key : Round Circles
You can press the Shift key while dragging to ensure your circle is perfectly round.
Colors
You can specify the colors with the Stroke and Fill Color Tools.
Color Tools:

Ctrl+G : Grouping Outline with Fill
When you draw a circle, Flash actually creates two objects: the fill and the outline. This may cause problems if you try to move your circle to a new position, because if you fail to select both objects, only the one selected will be moved. To avoid this it's often a good idea to "group" the outline with the fill, thus locking them together as if it was a single object.
1: Make sure both the fill and the outline is selected.
(You can do this in two ways: 1) Select the Arrow tool in the toolbox, and while holding down the SHIFT key click on both the fill and the outline. 2) Select the Arrow tool in the toolbox, and drag a rectangle outside your circle)
2: Press Ctrl+G to group the selected objects.
(If at a later point you want to "break" apart the grouped objects, you can do it by selecting the grouped object then pressing Ctrl+B).
Precise size and positioning
You can position the oval perfectly using the info panel.
Info Panel : Window > Panels > Info

The "square" connected to the line where it says "Click this square" is used to set the origin for coordinates - either at top left or center of the stage.
Fields for X and Y are used to enter the position of the selected object.
Fields for W and H are used to enter the width and height of the selected object.

Wingedge- Admin

-

Number of posts : 77
Age : 40
Name : Sir Francis
Year Level : Instructor
Location : UC
Registration date : 2008-06-10
Credits
GP: 9999
 Rectangle Tool

The Rectangle tool is used to make rectangular objects. Simply select the tool and drag on the Stage to draw a rectangle that spans between the start and end points.
SHIFT key : Proportioned Squares
You can press the Shift key while dragging to constrain proportions for the rectangle, to ensure your rectangle is a perfect square.
Colors
You can specify the colors with the Stroke and Fill Color Tools.
Color Tools:

Rounded Corners
You can specify the rounding of the corners with the "Round Rectangle Options" at the bottom of the toolbox.
Ctrl+G : Grouping Outline with Fill
When you draw a rectangle, Flash actually creates two objects: the fill and the outline. This may cause problems if you want to move your rectangle to a new position, because if you fail to select both objects, only the one selected will be moved. To avoid this it's often a good idea to "group" the outline with the fill, thus locking them together as if they were a single object.
1: Make sure both the fill and the outline are selected.
(You can do this in two ways: 1) Select the Arrow tool in the toolbox, and while holding down the SHIFT key click on both the fill and the outline. 2) Select the Arrow tool in the toolbox, and drag a rectangle outside your rectangle)
2: Press Ctrl+G to group the selected objects.
(If at a later point you want to "break" apart the grouped objects, you can do it by selecting the grouped object then pressing Ctrl+B).
Skewing
Before skewing a rectangle make sure it has been grouped. You can skew the rectangle in two ways.
To skew an object by dragging:
1. Select the object with the Arrow tool.
2. Click the Rotate button in the toolbox options.
3. Drag one of the centered handles.

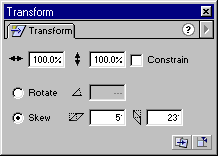
To skew an object using the Transform panel:
1. Select the object.
2. Choose Window > Panels> Transform.
3. Click Skew.
4. Enter angles for the horizontal and vertical values.

Precise size and positioning
You can position the Rectangle perfectly using the info panel.
Info Panel : Window > Panels > Info

The "square" connected to the line where it says "Click this square" is used to set the origin for coordinates - either at top left or center of the stage.
Fields for X and Y are used to enter the position of the selected object.
Fields for W and H are used to enter the width and height of the selected object.

Wingedge- Admin

-

Number of posts : 77
Age : 40
Name : Sir Francis
Year Level : Instructor
Location : UC
Registration date : 2008-06-10
Credits
GP: 9999
:: Lessons :: Basic Lessons
Page 1 of 1
Permissions in this forum:
You cannot reply to topics in this forum|
|
|
